

How Do You Draw A Bow
Asian Archery FAQ
How do I apply a Pollex-ring with a Mongolian Depict?
Use the following tips at your own discretion. We cannot be liable for any injury you might suffer due to practicing without a qualified coach.
Most Asian archery is performed with a Mongolian depict and a pollex ring. There are 2 common styles of ring: one is a elementary cylinder of bone or stone; the other is a band with a rigid tab which fits over the pad of the archer's thumb. The former can sometimes be found in Chinese crafts and antique shops. The latter can exist made easily by making a copper ring to fit loosely over your thumb, then fitting a piece of shoe leather around the inside so that it fits snugly when worn, and a thick leather tab extends out from the inside of the band to cover the pad of your thumb.
There are a number of important matters to consider before using the Mongolian draw:
- The Mongolian depict is suited to a bow which can withstand being drawn dorsum 34 - 36 inches. Practise non try information technology unless you are using a recurve that hands draws dorsum that far without risk of stress or excessive stacking.
- Employ a light bow until you are very familiar with the movements.
- Prepare some arrows of suitable length. Err on the side of having your arrows too long. Don't worry besides much about spine and your normal arrow measurement at commencement. Cull 34 inches (e.thousand. XX75 2022) or 36 inches (eastward.1000. XX75 2514). From the explanation of the technique given below, you will exist able to work out what length of arrow you lot need. Utilize arrows with long, low contour fletching.
- Brand sure your thumb-ring fits snugly and not too tightly. You thumb volition swell after almost 10 shots: allow for that. Line cylindrical rings with soft leather to obtain a comfortable fit. Cylindrical rings have a concave terminate and a convex end. Put your thumb into the ring from the convex finish: the concave cease is to let the tiptop of the thumb a little freedom to move.
- If possible apply a thicker string than normal or place tube of soft leather round the string at the arrow nocking point: thumb-rings are not designed for comfy utilise with a narrow string.
- Go on your nails - specially the thumb-boom - trimmed curt. The Mongolian release neatly but painfully removes long nails.
Bow Manus
Grip the bow with the main weight to be taken at the spider web of the thumb, opposite the index finger. The thumb should curl effectually to extend past the bespeak of the index finger. When the bow arm is extended, the superlative side (not the bottom side) of your bow arm should be perfectly level. The bow hand must not tilt upwards. The remaining three fingers curl around the grip equally if grasping an egg. They should exert a firm inward pressure on the bow grip without straining. Point at the target with the first joint of the thumb: non the index finger. That volition encourage the elbow joint to accept the correct position. The loving cup of the elbow joint should point upward and the knob downward. This volition help you to prevent your shoulder from coming upward.
In the Mongolian draw, the shaft of the arrow rests on the thumb/forefinger junction at the grip of the bow (non on the knuckle). For the right-handed archer, the arrow volition pass to the right of the grip and for the left-handed archer, to the left. This may be the opposite of what you are used to.
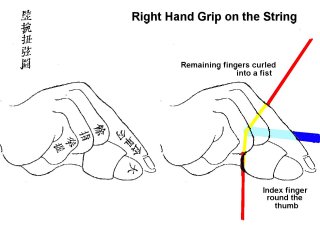
String Hand
First get the arrow nocked on the cord. Place the arrow and so that it is at correct-angles to the string (not pointed slightly down.) Draw the arrow back 1 inch on the string and grip the arrow shaft with the bow-hand fingers similar holding a pen. Now the arrow will be held firmly past the tension of the string and yous can move around freely with the arrow nocked and held in one hand. Utilize the cord-hand forefinger and the string itself to make a final aligning to the thumb-ring then that it is comfortable at the base of operations of the thumb, then claw the thumb around the string with the string at the lesser of the band, adjacent to the base of operations of the thumb. Whorl the alphabetize finger around to support the thumb but behind the nail. (Non on the nail itself. And ensure that the blast is cut short!) Curl the remaining 3 fingers back and press them lightly into your palm. Lower both artillery so that the arrow is pointed forrard at the footing about metre in front of your anxiety; take the strain of the string, drawn almost an inch, back from the bow-paw fingers and re-arrange the bow-mitt fingers as described to a higher place. Relax your body completely and clear your mind.
The Depict
Heighten the bow and and cord mitt high to come into the draw. Inhale while you are doing and so.
Depict smoothly pulling back and downwardly with the string hand and pushing forrad and down with the bow hand. Y'all should be able to draw the pointer and then that the depict-mitt is above your nipple and the bow-hand is extended straight out. Practise non permit the depict-hand elbow droop. Do non let the bow-paw turn upwardly. Keep your shoulder from hunching. Do not endeavour to release with the arrow at eye-level. You cannot sight down the arrow without spoiling the draw. If your bow-hand is slanted upward to middle-level, when you release it will drop and spoil the shot.
The Full-draw and Release
When the arms are quite level, at that place is a straight line from the bow-paw wrist, through the elbow to the shoulders and and then dorsum to the string-hand. For elevation, raise the bow mitt and drop the draw-arm elbow in co-ordination: but proceed them in a direct line. Practise not bend back at the waist. Your body should be perfectly vertical and your caput equally if suspended from the top with a string from the sky. At this point, effort to push the breath in your breast down into your belly. Apply the back muscles to bring the arrow back: it is not ready for release until the pointer caput can be felt touching the junction betwixt the bow-manus forefinger and pollex. Exercise not jerk back: allow the pointer come back slowly and let the experience of the arrowhead arriving act like a clicker: relax the depict-hand forefinger and thumb simultaneously. The arrow leaves the bow and the the draw-paw elbow falls back. Release your breath gently.
The bow-hand must not react! It must remain perfectly nonetheless. Exercise not drop the bow manus, fling back the cord hand or do any theatricals. Simply remain withal and relaxed. Observe the flying of the arrow and correct your faults appropriately.
Concentration
As you draw the string back, yous concentrate on the target. Pick the smallest point visible on the target. If it is a target barrel, concentrate on a hole left by a previous shot: not on the whole xanthous circle. If the target is an animal, concentrate on a single hair or feather, not on the breast.
Between the fourth dimension when you lot feel your arms and shoulders are level, and before the arrowhead reaches the finger of the bow hand, maximize your concentration. Merely do non concentrate on the target: you already know where information technology is and your mind and limbs already know what you desire to exercise. Concentrate instead on your shot. Concentrate on the feeling of the shot being right. Wait for the feeling of the arrowhead on the finger, and when it arrives, exercise non hesiate: relax and release. The release is not predictable. It is similar a dragonfly touching the surface of a pond or a ripe gourd falling off the vine.
This is the correct technique for the draw as described by the Chinese author, Gao Ying, in 1637. It is consistent with traditional Mongolian practice, and forms the basis of certain (but not all!) schools of Japanese Kyudo.
� Stephen Selby 1998.
Up-dated 5 October 1998

Source: https://atarn.org/FAQ/thumbring.htm
Posted by: ramosbuttle.blogspot.com
0 Response to "How Do You Draw A Bow"
Post a Comment